EVERYTHING THAT YOU SHOULD KNOW ABOUT RED HAT’S NEW REMOTE EXAMS
System Requirements
Computer: You will need a computer with a single active monitor. Red Hat Supports many Intel compatible X86_64-bit architecture computers.
USB: One USB Drive (2.0 or higher) with at least 8 GB capacity.
NOTE: The entire disk will be overwritten, so make sure you have saved any contents you may have on the disk before following the procedure for creating thelive exam environment.
USB Hub: One wired USB hub is allowed if a hub is needed to accommodate permitted peripheral devices as described below.
Hard Drive: A hard drive with free storage capacity of at least 4 GB (for Live USB creation only).
Mouse: A wired mouse is optional but recommended. A wireless mouse is not allowed. A wired mouse is required if you use a laptop in a closed and docked mode as described below.
Keyboard: Only one keyboard is allowed for the exam. If you wish to use an external, wired keyboard with your laptop, you will have to use the laptop closed and docked. This will require the use of an external monitor and wired mouse as well. Wireless keyboards are not permitted.
Webcam: One external webcam with at least a 1m cable.
Monitors: Only one physical display will be allowed for the exam.
Connecting an external monitor to a laptop: you are only allowed to use one monitor, one keyboard and one external mouse. If you chose to connect an external monitor to your laptop, the laptop lid must be closed throughout the duration of the exam session. You will be required to use a wired keyboard and a wired mouse.
Sound and microphone: A working microphone is required. Verify that the audio and microphone are not set on mute prior to the exam.
Operating system: N/A
Firewalls: Firewalls that allow normal web activities will typically work. More restrictive firewalls that limit outgoing access and that require additional authentication may cause problems. Most firewall issues will show up when you run the compatibility test.
RAM: Minimum 4GB of RAM are required.
Internet connection speed: Download speed requirements are 768Kbps and upload speed requirements are 512Kbps.
Network connection: Unless it is physically not possible, a wired network connection should be used, not wireless, to ensure the most reliable delivery of your exam.
Laptop battery: If using a laptop, please ensure that the built-in battery is fully charged just in case there is an interruption of power. Do not rely on the battery as the principal power source.
Power: Recommended to use an uninterrupted power supply (UPS) for your computer, external monitor (if used) and networking equipment to maintain internet connectivity during power outages.
The 2 important steps for Red Hat Remote exams, explained in detail
Step 1
1. Create a Remote Exam Bootable Live USB
2. Connect the USB drive intended for creation of Live USB
4. Use the Fedora Media Writer to write the downloaded .iso file to your USB drive.
a. Launch Fedora Media Writer from the list of installed programs
b. Select Custom Image.
c. Navigate to the bootable live usb image (.iso) stored in your computer, click on Open’ and bring up the ‘Write Custom Image’ window.
If you have a USB drive connected to your computer, Fedora Media Writer will display that as the target device to create a bootable image. Note: Fedora Media Writer destroys all data on the USB stick while creating a Live USB media. We recommend you back up the contents of your USB drive beforehand.
d. Select ‘Write To Disk’ to initiate the Live USB creation process. The ‘Write Custom Image’ window should identify the connected USB drive.
5. Close the window once the writing process is completed
6. Boot to the Remote Exam Bootable Live USB
7. For other Linux Distributions please use image writing app like Etcher > https://www.balena.io/etcher/ and follow the steps to make your USB Stick bootable.
Step 2
Booting to the Remote Exam Live USB image
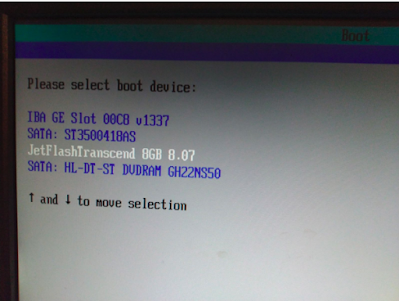
1. Restart your computer/Mac and go to the Boot Menu. Select your boot device as USB Flash Drive.
1.Note: Depending on your hardware, the keystroke to enter the boot menu may differ. The typical keys used for various hardware are, but not limited to ‘delete’, ‘enter’, F2, F4, F10 and F12. Look at the splash screen when the computer starts to know the key to enter startup or modify boot order.
2. For Mac, press and hold the Option key to access the startup manager and select the boot device
2. Boot order selection screen - will differ on various systems, a typical screen given below:
3.Wait for the exam to load.
4.Click OK at the welcome screen
5. Use the Settings page to make changes such as mouse and touchpad speed, region/language, sound levels etc. The hamburger button next to ‘Settings’ provides a list of available keyboard shortcuts
6. Go to Network and make sure that your wired internet connection is recognized. Wifi compatibility with the Remote Exam Live USB cannot be guaranteed on all makes of hardware. Wifi may not be listed if the wireless adapter is not recognized by the image. If the Wifi adapter in your computer is recognized, you may be able to connect to a wireless router with the router password. Additional credentials may be needed to connect to your Internet Service Provider. Please note that network performance and stability will depend on various aspects such as the distance between your computer and the wifi router, bandwidth shared with other connected devices etc.
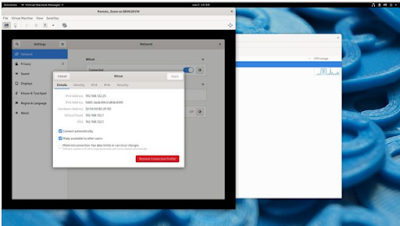
7. After connecting to the internet, close the settings window to connect to the Red Hat Individual Exam Scheduler page
8.Login using your redhat.com account username and password. Ensure that this is the same that was used to purchase the exam.
9.Once inside the Live Environment, run the Compatibility Check to verify that your system requirements are met.
10. Raise a live chat with support if you have questions during the compatibility test.
11. Return to the main section and press the power button of your computer briefly to get the prompt to shut the machine down.
12. Your Exams section will display your scheduled exams within the next 24 hours. Please click on this section next to the compatibility check to proceed if you are going to start your exam.
FREQUENTLY ASKED QUESTIONS
Hardware and Bootable Media
Why does it take a very long time to download the Remote Exam Live USB image?
The Remote Exam Live USB image is approximately 2 GB in size. Download speeds can vary depending on a variety of factors such as the available bandwidth and download speed of your internet connection at the time of downloading, number of users connected to the same router, distance from your wifi router, hardware specifications etc.
Fedora Media Writer throws errors while creating a Live USB on Windows 10
There are a few errors seen occasionally when Fedora Media Writer is used to create a Live USB from an iso file in Windows 10. Some of the screenshots given below.
1.The Remote Exam image size is at the borderline of 4GB and hence using an old 4GB thumb drive will cause the above error as the actual size of the image exceeds 4000 Megabytes. Use a drive that is 8 GB or larger in size.
2.Fedora Media Writer saves the ISO to your USB and then reads it back to verify that it gets the same data back as it wrote. If the read does not match the write, FMW will show an error saying ‘Your Disk is Probably Damaged’. This is a very stark message which actually means “Warning – there are inconsistencies between what was written and what was read back”. There are many possible reasons why the read might not match the write and it doesn’t always necessarily mean that the write failed or that the USB will not work. You can ignore this message on an otherwise known good USB and continue using the same.
Click on ‘Cancel’ to exit Fedora Media Writer, reboot your system and try to boot from the USB drive. If it boots successfully to the Remote Exam image, the USB drive and the image on it is fine and can be used for your exam.
1.Clicking on the Retry button and re-attempting the write process may fix the error
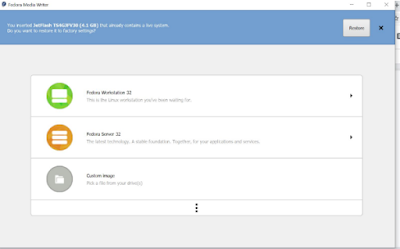
2.The above error may also appear if there is an existing Live USB in the disk already. The presence of a Live USB will be detected by FMW and a ‘Restore’ option will be available to format the drive. Click on Restore, finish the format process and reattempt the process of creating a Live USB.
After the exam, how do I reformat my USB drive?
Using Fedora Media Writer: Connect the USB drive to your computer and start Fedora Media Writer. You will see a prompt to restore the USB drive to “Factory Settings”: Follow the instructions to restore your USB drive to the Factory Settings
**Note to Windows Users: “Factory Settings” would most likely imply that your USB drive is formatted in the FAT32 file system. FAT32 does not allow transfer of files larger than 4GB and hence most Windows users prefer NTFS.
exFAT handles larger files and is Windows and Mac OS compatible. Hence, you will need to use an additional level of formatting using the Windows format utility.
Can I use a wireless internet connection?
Wifi is not advised. Wherever possible, use a wired internet connection for stability and compatibility. Wifi speeds can vary based on a variety of factors which may have an impact on your exam. The Remote Exam Live USB may not detect all wireless network adapters. If the wifi adapter of your computer is not detected by the Remote Exam Live USB image, then wired internet will be the only option.
How many free USB ports should be available for use during the exam?
You should ideally have a minimum of two USB ports available in a laptop for a bootable USB drive and an external web camera. In the case of a desktop computer, the requirement would be four ports for the following devices: One external webcam, USB drive, keyboard and mouse.
I am unable to download the Remote Exam Live USB image
Your computer and the network you are connecting from must have the necessary privileges and permissions to download files from a third party source. The operating system used must have administrative (Windows) or root/sudo privilege (Linux/Mac). Firewalls and Security restrictions on your network setup might block such downloads. Try a personal computer and/or home network to perform these tasks.
Can I boot to the exam environment using a virtual machine rather than a USB drive?
No. The Remote Exam image must be loaded on a USB drive. Booting off a Virtual Machine is not allowed.
Can I create a bootable live USB by keeping my existing data in the same USB drive?
No. The process of live USB creation will wipe out any existing data and reformat your USB drive as needed.
Is a desktop computer allowed?
Yes
Is an iMac allowed?
Compatibility cannot be guaranteed. If your pre-exam test by booting in to the Remote Exam Live USB works fine, then you can proceed. A few things to note:
iMacs come with wireless keyboard and mouse. Wireless devices may not work.
Detection and stable performance of wifi internet is NOT guaranteed.
Using a wired keyboard and mouse and a wired internet on an iMac should work fine subject to successful pre-exam testing.
One external webcam with at least 1m cable and 90 degree field of view or more is required. The webcam must be focusable from 10 cm to 2 m.


